I've been learning Ionic through a Virtual Machine hosted on a trial subscription for Windows Azure, it was part of the course. While this may be acceptable for some, when it comes to your average student it's a bit overkill. On top of that everything was done in VI, which isn't the best environment for most users. Most people aren't going to know how to get anything done in Linux to begin with.
That being said, developing in Windows would be optimal. So let's do that...
Unfortunately, the documentation for installing Ionic on a Windows OS isn't what I would consider "well done". I would best describe it as following a trail bread crumbs. No one guide actually contained everything I needed. The Ionic guide does the job, but expect to follow most every link on the page to a relevant library doc.
So, I'll try to save you some time.
First let's open Ionic's installation guide in another tab for reference. I'll just provide some help on everything that tripped me up as you go through the install process.
To preface: You will need the JavaSDK, as well as IOS and/or Android SDK's for actually publishing apps on their respective platform. I personally won't bother with IOS at this stage, as I'm an android kinda guy. Sorry, Apple fans.
If you've got those installed, it's time to get Git for Windows. Most of the installer is a typical game of smash the next button. Except for this screen:
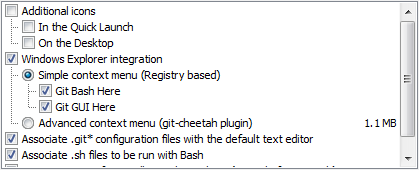
Make sure you check the Git Bash box, and the GUI is optional.
The next screen determines how you run Git. You can run it from the Command Prompt, with or without Unix tools. It really didn't matter to me, I stuck with the Git Bash.

This next screen should look like this, as it says; its the recommended setting for windows.

The Git bash will make installing things a bit easier. Instead of downloading installers we just run one from the command line. But before we get to do any of that, we need NodeJs, there's a big green INSTALL button on their website, you can't miss it. Installing it should be easy. Click next/okay/yes/letsgetthisdone until it goes away.
Now run the Git Bash. It should show up in the Windows start button search box. Just type this in the command line and hit enter:
npm install -g cordovaNote: You may run into issues with these commands, on Windows 8.1 my Environment Variables weren't working properly. If you get an error similar to "npm not found", try a reboot.
Assuming Cordova installed correctly, now install ionic:
npm install -g ionicNow that ionic is installed, you can create a starter app from a template using the following command:
ionic start myApp sidemenuBy default, a folder named myApp will be created in your user folder, usually located in the Users folder on the C drive. Open the myApp folder, then the WWW folder. Open the index.html file to see the app.
Most of the important files you will be working with are in the WWW folder. You can edit these with whatever IDE you prefer for JavaScript and HTML. I'll cover that at a later time.
No comments:
Post a Comment