If you are having troubles with AngularJS and understanding scope, directives, and services; this guy does a great job of explaining everything. The video is a bit long, so make sure you have the time to watch the whole thing.
Monday 9 March 2015
Saturday 7 March 2015
AirDroid
You've hopefully got a packaged app for your Android device by now. There are a few different ways of moving that your phone, but a handy app I found to help with that is called AirDroid. Instead of getting drivers for your phone and connecting via USB or downloading it from online storage, you can drop it to the AirDroid window and send the file straight to your phone. After that it's as simple as opening your notifications window and tapping on your app.
Now there's one thing to be aware of, your app will be unsigned. Which means your phone will complain about security issues, but you can bypass that warning and install it anyways. Just be careful if you use this method to install other unsigned apps. If it's code you don't trust, you probably shouldn't install it on your phone. But if you are testing your own app there should be nothing to worry about, security wise at least.
To find the .apk file after building it with cordova, navigate to your apps folder. From there it should be around here:
So once it's on our phone, run it like any other app.
Now there's one thing to be aware of, your app will be unsigned. Which means your phone will complain about security issues, but you can bypass that warning and install it anyways. Just be careful if you use this method to install other unsigned apps. If it's code you don't trust, you probably shouldn't install it on your phone. But if you are testing your own app there should be nothing to worry about, security wise at least.
To find the .apk file after building it with cordova, navigate to your apps folder. From there it should be around here:
\sidemenu\platforms\android\ant-buildCordovaApp-debug.apk
So once it's on our phone, run it like any other app.
Friday 6 March 2015
Setting up the Android Platform
I'm going to preface this is a warning. A lot can, and likely will go wrong when you attempt to package your app for each platform. I'll be covering android again, and most of the work is done via installing the various SDK's and ensuring the PATH environment variable is correct. If you haven't already, download and install the latest JavaSDK, Android, and Apache Ant. Java and Ant should automatically update your system's environment variables, but in the event it fails; you will be doing it yourself. Android should as well but it failed to in my case. Chances are though, you will need to add an Environment Variable yourself. So heres how to do it:
Windows 8:
Environment Variables in this case is sort of a shortcut that the operating system knows of. When you run ipconfig from the command prompt, your computer knows exactly where to find it, regardless of your current working directory (which is usually in your documents folder). In the case where you are trying to run non-windows programs in that manner, you need to tell it where the relevant folders are. That's exactly what were doing with Environment Variables, we are creating shortcuts for the Git bash to use. So if you try to run a command in Git bash, and get an error about ANDROID_HOME, you know your Environment Variable for the Android SDK is not correct, or missing.
There should System variables for ADT_HOME, ANDROID_HOME, ANT_HOME,GIT_HOME, and JAVA_HOME. Additionally, there should a few in the PATH variable. The PATH variable is a pain. The window it is housed in cannot be resized, and you have a massive string contained in a small text window. For example, here's what my PATH variable looks like:
It's ridiculous. So if you need to edit your PATH; I strongly suggest you copy the whole string into a document and edit it from there. Copy and paste it back into the tiny text box, and apply. But save your original PATH in case you mess something up.
The next thing to do is download Android API-19 using the android SDK manager, you may need to run it as an administrator.
If all of that works, you should be able to open Git bash and run these two commands
If it throws an error, it should give some indication as to where your problem is. Likely an Environment Variable is pointed to the wrong folder, or something isn't installed. For example if it mentions Android-20, you need to download Android API-20.
Windows 8:
- Go to your windows start screen
- Type system into the search box and open it
- Open the Advanced System Settings on the left side of the window
- The button to access the Environment Variables should be right above the Cancel button in this window
- Your variables should be in the bottom half of the window, that's where the system wide variables are.
Environment Variables in this case is sort of a shortcut that the operating system knows of. When you run ipconfig from the command prompt, your computer knows exactly where to find it, regardless of your current working directory (which is usually in your documents folder). In the case where you are trying to run non-windows programs in that manner, you need to tell it where the relevant folders are. That's exactly what were doing with Environment Variables, we are creating shortcuts for the Git bash to use. So if you try to run a command in Git bash, and get an error about ANDROID_HOME, you know your Environment Variable for the Android SDK is not correct, or missing.
There should System variables for ADT_HOME, ANDROID_HOME, ANT_HOME,GIT_HOME, and JAVA_HOME. Additionally, there should a few in the PATH variable. The PATH variable is a pain. The window it is housed in cannot be resized, and you have a massive string contained in a small text window. For example, here's what my PATH variable looks like:
C:\ProgramData\Oracle\Java\javapath;C:\Program Files (x86)\NVIDIA Corporation\PhysX\Common;C:\Windows\system32;C:\Windows;C:\Windows\System32\Wbem;C:\Windows\System32\WindowsPowerShell\v1.0\;C:\Program Files (x86)\Windows Kits\8.1\Windows Performance Toolkit\;C:\Program Files\Microsoft SQL Server\110\Tools\Binn\;C:\Program Files (x86)\Microsoft SQL Server\100\Tools\Binn\;C:\Program Files\Microsoft SQL Server\100\Tools\Binn\;C:\Program Files\Microsoft SQL Server\100\DTS\Binn\;C:\Program Files (x86)\Microsoft SDKs\TypeScript\1.0\;C:\Program Files\Microsoft SQL Server\120\Tools\Binn\;C:\Program Files\nodejs\;C:\apache-ant-1.9.3\bin;C:\Program Files (x86)\Git\cmd;C:\Program Files\Java\jdk1.8.0_25\bin; %ADT_HOME%\tools;%ADT_HOME%\platform-tools\tools; %ADT_HOME%\tools;%ADT_HOME%\platform-tools\platform-tools\tools; %ADT_HOME%\tools;;%GIT_HOME%\cmd;
It's ridiculous. So if you need to edit your PATH; I strongly suggest you copy the whole string into a document and edit it from there. Copy and paste it back into the tiny text box, and apply. But save your original PATH in case you mess something up.
The next thing to do is download Android API-19 using the android SDK manager, you may need to run it as an administrator.
If all of that works, you should be able to open Git bash and run these two commands
cordova platform add android
cordova build
If it throws an error, it should give some indication as to where your problem is. Likely an Environment Variable is pointed to the wrong folder, or something isn't installed. For example if it mentions Android-20, you need to download Android API-20.
Monday 2 March 2015
State Parameters and More Scope
In my last post I explained $scope a bit, in this post we expand on that and start manipulating scope along side the $stateParams. State Parameters are initially defined in the app.js file, right now we are interested in one in particular.
If you look at the url, you will notice something odd about the playlistId. A colon (the punctuation mark, kind of colon) precedes it, what is basically going to happen is; the last bit of the url will be assigned to a variable called playlistId.
Remember this line?
The easier part is shifting id numbers, in app.js we are going to do this:
So let's populate the playlist controller with actual playlists.
The next part is to display all of that information using a small bit of HTML:
Here's a little walk through to help out, in case something didn't quite make sense.
You can get the app from my screencast here.
.state('app.single', {
url: "/playlists/:playlistId",
views: {
'menuContent': {
templateUrl: "templates/playlist.html",
controller: 'PlaylistCtrl'
}
}
});
If you look at the url, you will notice something odd about the playlistId. A colon (the punctuation mark, kind of colon) precedes it, what is basically going to happen is; the last bit of the url will be assigned to a variable called playlistId.
Remember this line?
<ion-item ng-repeat="playlist in playlists" href="#/app/playlists/{{playlist.id}}">Notice anything about the href? {{playlist.id}} is pulled from scope and used to create the url for that specific playlist. Then you can use $stateParams to include that id as a dependency, which then can be assigned to the $scope. How you take advantage of this is up to you, but I'm going to do something simple for demonstrative purposes. We are going to create an array of playlists and shift the id numbers of the Playlists so they are array friendly (start at zero).
The easier part is shifting id numbers, in app.js we are going to do this:
.controller('PlaylistsCtrl', function($scope) {If my reasoning doesn't make sense now, it will later, hopefully. First, we need to create some playlists. Of course, whoever created this template doesn't know good music so I'm going to just copy paste fake song names... except for the cowbell playlist, I've got that covered.
$scope.playlists = [
{ title: 'Reggae', id: 0 },
{ title: 'Chill', id: 1 },
{ title: 'Dubstep', id: 2 },
{ title: 'Indie', id: 3 },
{ title: 'Rap', id: 4 },
{ title: 'Cowbell', id: 5 }
];
})
So let's populate the playlist controller with actual playlists.
.controller('PlaylistCtrl', function($scope, $stateParams) {$scope.playlistSet is made up of an array, of arrays, of objects. And you will also notice how we used the playlistId to create $scope.id. We need that id to pick the right array to list in the playlist window.
$scope.playlistSet = [
[
{ track: '1', artist: 'Whoever'},
{ track: '2', artist: 'Whatever'},
{ track: '3', artist: 'Whenever'},
{ track: '4', artist: 'Whomever'}
],
[
{ track: '1', artist: 'Whoever'},
{ track: '2', artist: 'Whatever'},
{ track: '3', artist: 'Whenever'},
{ track: '4', artist: 'Whomever'}
],
[
{ track: '1', artist: 'Whoever'},
{ track: '2', artist: 'Whatever'},
{ track: '3', artist: 'Whenever'},
{ track: '4', artist: 'Whomever'}
],
[
{ track: '1', artist: 'Whoever'},
{ track: '2', artist: 'Whatever'},
{ track: '3', artist: 'Whenever'},
{ track: '4', artist: 'Whomever'}
],
[
{ track: '1', artist: 'Whoever'},
{ track: '2', artist: 'Whatever'},
{ track: '3', artist: 'Whenever'},
{ track: '4', artist: 'Whomever'}
],
[
{ track: 'Honky Tonk Women', artist: 'The Rolling Stones'},
{ track: 'Were an American Band', artist: 'Grand Funk Railroad'},
{ track: 'Dont Fear the Reaper', artist: 'Blue Oyster Cult'},
{ track: 'Hair of the Dog', artist: 'Nazareth'},
]
];
$scope.id = $stateParams.playlistId;
});
The next part is to display all of that information using a small bit of HTML:
<ion-view view-title="Playlist">That's what our playlist.html file looks like. What's happening is ng-repeat looks at each item in the array located at playlistSet[id]. The id chooses the appropriate set of songs, and then goes through the array of songs and lists the track and artist.
<ion-content>
<ion-list ng-repeat="playlist in playlistSet[id]">
<ion-item>Track: {{playlist.track}} <br/> By: {{playlist.artist}}</ion-item>
</ion-list>
</ion-content>
</ion-view>
Here's a little walk through to help out, in case something didn't quite make sense.
You can get the app from my screencast here.
Friday 27 February 2015
Scope
Let's actually jump into something that isn't as mundane as adding and removing tags. If you plan on doing anything more than just hard coding everything into your html pages, you're going to need to understand Scope. If you have some comprehension of scope in terms of other programming languages, you can effectively apply that to Scope in Angular apps. Normally variable visibility or accessibility in scope is more of a concept, whether or not a variable can be accessed in a function is determined by where it was declared and how it was passed into the function. It's a similar concept in Angular, but oddly enough you actually use the keyword $scope. To put it as plainly as I possibly can, your web pages are used for displaying something (obviously). But most of the time you want to display something that is dynamic, and constantly changing. A calendar app needs to be designed to handle changes in your schedule, and a Twitter feed app needs to handle a constant stream of Tweets. The point is, a static app is a boring and largely useless app. You can't really handle dynamic content with Html, it's a markup language, it doesn't know what variables are. It just passes that onto Javascript, your html page just sort of creates a container for your script(s) to work in.
So, in today's day and age of the dominance of Object Oriented languages, we expect a bit more out of our programming languages. Which is why everyone in the tech industry seems to be creating their own libraries and frameworks for widely used languages, case in point: AngularJS. AngularJS was created by Google, and is the primary driver behind Ionic apps. In your html files Ionic created, in the sidemenu template you will find directives like ng-repeat and ng-bind. These directives give your elements special behaviors, and are a part of the AngularJS framework. For example, ng-repeat works like a for each loop. It can access a list of items in $scope and do something with each item in the list. Which is what we're going to look at today.
To start things off open the controllers.js file and find this controller:
In this case $scope.playlists is an array of simple objects. They have a title and an id. So if you serve the app locally from the Git Bash, you see that array of objects listed in the Playlists menu. Actually the Playlists page should be opened first, thanks to the default state set by the app.js file, specifically by the last line of code.
Now if you look at the playlists.html file this bit should actually mean something to you:
Think of it like this in your head: "For each playlist in playlists: create a link(href) and display the playlist title". In my next post I will expand on this and populate each playlist using the $scope. Because hardcoding all that in with html is boring.
So, in today's day and age of the dominance of Object Oriented languages, we expect a bit more out of our programming languages. Which is why everyone in the tech industry seems to be creating their own libraries and frameworks for widely used languages, case in point: AngularJS. AngularJS was created by Google, and is the primary driver behind Ionic apps. In your html files Ionic created, in the sidemenu template you will find directives like ng-repeat and ng-bind. These directives give your elements special behaviors, and are a part of the AngularJS framework. For example, ng-repeat works like a for each loop. It can access a list of items in $scope and do something with each item in the list. Which is what we're going to look at today.
To start things off open the controllers.js file and find this controller:
.controller('PlaylistsCtrl', function($scope) {This creates a controller for the Playlists page, it's name is 'PlaylistsCtrl'. If you think in terms of Java or C#, look at it like a constructor, it might make more sense. The first argument passed in is the name for the new controller, the second is a function that modifies the $scope. Normally in Java/C# you have a whole class dedicated to an object with variables and methods/functions, in AngularJS you can create the function right then and there without giving it a name, and attach it to that controller. Which is what " function($scope) {...} " does. So when the playlists page is loaded, the controller and it's scope is then attached. Which means you can access everything in the $scope from your html file.
$scope.playlists = [
{ title: 'Reggae', id: 1 },
{ title: 'Chill', id: 2 },
{ title: 'Dubstep', id: 3 },
{ title: 'Indie', id: 4 },
{ title: 'Rap', id: 5 },
{ title: 'Cowbell', id: 6 }
]; })
In this case $scope.playlists is an array of simple objects. They have a title and an id. So if you serve the app locally from the Git Bash, you see that array of objects listed in the Playlists menu. Actually the Playlists page should be opened first, thanks to the default state set by the app.js file, specifically by the last line of code.
$urlRouterProvider.otherwise('/app/playlists');Hopefully it's beginning to make some sense.
Now if you look at the playlists.html file this bit should actually mean something to you:
<ion-item ng-repeat="playlist in playlists" href="#/app/playlists/{{playlist.id}}">
{{playlist.title}}
</ion-item>
Think of it like this in your head: "For each playlist in playlists: create a link(href) and display the playlist title". In my next post I will expand on this and populate each playlist using the $scope. Because hardcoding all that in with html is boring.
Tuesday 24 February 2015
Eye Candy
At this point, you should be ready to start making changes to the templates and get a feel for how Ionic apps work. Hopefully you have some experience with HTML and Javascript, if not; Codecademy has some excellent online courses to get you familiar.
If you go find the app you created previously, you will find a few folders. The one you will be primarily working with are in the WWW directory. From there it should be pretty self explanatory as to what is in each child folder. Most of the work will be done in the templates folder, where the html files are stored. If you open one up you will find that most of the normal HTML tags you would expect aren't used much. You can, but a lot of the ionic tags provide you with a substantial amount of functionality without much effort.
For example, you could easily add an icon with the <i> tag, as well as apply a color to it without actually creating the icon. Icons, colors, and styles are all included in the Ionic library and are easily found here and here.
So lets add a Facebook icon to our sidemenu app we previously created. The actual menu in the app is located in the menu.html file the templates folder. Open that up and you will notice the tag for the login button looks like this:
We can change the look of the login button by adding a color and an icon with the class attribute. We can class the login button as an icon, and set it to blue with the Facebook icon by adding:
So that it should look like this:

If you wanted to leave the actual login text alone, just put {class="icon ion-social-facebook positive"} into an <i> tag.
Like so:

To break it down, "ion-social-facebook" determines which icon it will display, and "positive" determines the color. These colors are in the ionic.css, so you can modify them if you wish. A CSS file is also located in the CSS folder if you would rather style it the old fashioned way, and since Ionic is built on Sass you could also modify the color variables within the variables.scss file, or add your own.
Inside your app folder, navigate to and open the variables.scss file. It's located at:
If you go find the app you created previously, you will find a few folders. The one you will be primarily working with are in the WWW directory. From there it should be pretty self explanatory as to what is in each child folder. Most of the work will be done in the templates folder, where the html files are stored. If you open one up you will find that most of the normal HTML tags you would expect aren't used much. You can, but a lot of the ionic tags provide you with a substantial amount of functionality without much effort.
For example, you could easily add an icon with the <i> tag, as well as apply a color to it without actually creating the icon. Icons, colors, and styles are all included in the Ionic library and are easily found here and here.
So lets add a Facebook icon to our sidemenu app we previously created. The actual menu in the app is located in the menu.html file the templates folder. Open that up and you will notice the tag for the login button looks like this:
<ion-item nav-clear menu-close ng-click="login()">
Login
</ion-item>
We can change the look of the login button by adding a color and an icon with the class attribute. We can class the login button as an icon, and set it to blue with the Facebook icon by adding:
class="icon ion-social-facebook positive"
So that it should look like this:
If you wanted to leave the actual login text alone, just put {class="icon ion-social-facebook positive"} into an <i> tag.
Like so:
<i class="icon ion-social-facebook positive"></i>A quick note, I was forced to close the <i> tag in that manner, if you try to close the tag in the initial tag, it will not properly close it, and cause undesired results. But if done right, it should look like this.
Inside your app folder, navigate to and open the variables.scss file. It's located at:
www\lib\ionic\scss\_variables.scssThe colors are right there at the top, so feel free to use your favorite hex color picker to modify them. You could add your own if you have experience with Sass.
Saturday 21 February 2015
Finding an IDE
IDE's are entirely up to the preferences of the developer. So while I might suggest Sublime Text (and I do), some might prefer Eclipse, Netbeans, or Webstorm. You could skip the pain of hunting down support tools for ionic or AngularJS, and just build the app with Notepad++. Because unfortunately from what I can tell, support for Ionic itself is a little sparse as far as IDE's go. Cordova is typically readily supported, but intellisense is another story. It's all strictly quality of life enhancements, so assuming you know how to deploy the app through the ionic command line, you really don't need a fully fledged IDE.
So to simplify things, let's start with getting Sublime Text. It has an unlimited evaluation license, so if you like it, you should buy it. Once you have that installed go get the package control plugin.
Now you can get the ionic tools using the package controller from the Preferences Controls, just click Package Control: Install Package and type Ionic Framework in the search box. Click it and restart Sublime. Do the same for AngularJS.
If you're a big fan of Visual Studio because you happened to get a copy through Dream Spark, and have been developing on it since, there's hope.

Visual Studio 2013 has a few plugins and templates available for Ionic via online templates, it also provides an emulator (Ripple) if you download the Cordova tools . You could then package it with either Visual Studio or Ionic. Visual Studio gave me too much trouble and I don't see the point in jumping through hoops if a simple command in the Git Bash will do it. So I'll just show you how to do it that way.
In the next episode.
 |
| Sublime Text 2 in Action |
So to simplify things, let's start with getting Sublime Text. It has an unlimited evaluation license, so if you like it, you should buy it. Once you have that installed go get the package control plugin.
Now you can get the ionic tools using the package controller from the Preferences Controls, just click Package Control: Install Package and type Ionic Framework in the search box. Click it and restart Sublime. Do the same for AngularJS.
If you're a big fan of Visual Studio because you happened to get a copy through Dream Spark, and have been developing on it since, there's hope.
Visual Studio 2013 has a few plugins and templates available for Ionic via online templates, it also provides an emulator (Ripple) if you download the Cordova tools . You could then package it with either Visual Studio or Ionic. Visual Studio gave me too much trouble and I don't see the point in jumping through hoops if a simple command in the Git Bash will do it. So I'll just show you how to do it that way.
In the next episode.
Tuesday 17 February 2015
Install this, then that, and that.
Today we're installing Ionic on Windows.
I've been learning Ionic through a Virtual Machine hosted on a trial subscription for Windows Azure, it was part of the course. While this may be acceptable for some, when it comes to your average student it's a bit overkill. On top of that everything was done in VI, which isn't the best environment for most users. Most people aren't going to know how to get anything done in Linux to begin with.
That being said, developing in Windows would be optimal. So let's do that...
Unfortunately, the documentation for installing Ionic on a Windows OS isn't what I would consider "well done". I would best describe it as following a trail bread crumbs. No one guide actually contained everything I needed. The Ionic guide does the job, but expect to follow most every link on the page to a relevant library doc.
So, I'll try to save you some time.
First let's open Ionic's installation guide in another tab for reference. I'll just provide some help on everything that tripped me up as you go through the install process.
To preface: You will need the JavaSDK, as well as IOS and/or Android SDK's for actually publishing apps on their respective platform. I personally won't bother with IOS at this stage, as I'm an android kinda guy. Sorry, Apple fans.
If you've got those installed, it's time to get Git for Windows. Most of the installer is a typical game of smash the next button. Except for this screen:
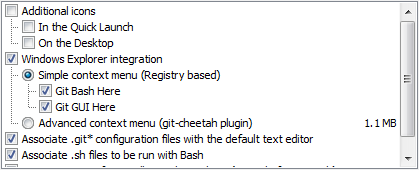
Make sure you check the Git Bash box, and the GUI is optional.
The next screen determines how you run Git. You can run it from the Command Prompt, with or without Unix tools. It really didn't matter to me, I stuck with the Git Bash.

This next screen should look like this, as it says; its the recommended setting for windows.

The Git bash will make installing things a bit easier. Instead of downloading installers we just run one from the command line. But before we get to do any of that, we need NodeJs, there's a big green INSTALL button on their website, you can't miss it. Installing it should be easy. Click next/okay/yes/letsgetthisdone until it goes away.
Now run the Git Bash. It should show up in the Windows start button search box. Just type this in the command line and hit enter:
Note: You may run into issues with these commands, on Windows 8.1 my Environment Variables weren't working properly. If you get an error similar to "npm not found", try a reboot.
Assuming Cordova installed correctly, now install ionic:
Now that ionic is installed, you can create a starter app from a template using the following command:
By default, a folder named myApp will be created in your user folder, usually located in the Users folder on the C drive. Open the myApp folder, then the WWW folder. Open the index.html file to see the app.
Most of the important files you will be working with are in the WWW folder. You can edit these with whatever IDE you prefer for JavaScript and HTML. I'll cover that at a later time.
I've been learning Ionic through a Virtual Machine hosted on a trial subscription for Windows Azure, it was part of the course. While this may be acceptable for some, when it comes to your average student it's a bit overkill. On top of that everything was done in VI, which isn't the best environment for most users. Most people aren't going to know how to get anything done in Linux to begin with.
That being said, developing in Windows would be optimal. So let's do that...
Unfortunately, the documentation for installing Ionic on a Windows OS isn't what I would consider "well done". I would best describe it as following a trail bread crumbs. No one guide actually contained everything I needed. The Ionic guide does the job, but expect to follow most every link on the page to a relevant library doc.
So, I'll try to save you some time.
First let's open Ionic's installation guide in another tab for reference. I'll just provide some help on everything that tripped me up as you go through the install process.
To preface: You will need the JavaSDK, as well as IOS and/or Android SDK's for actually publishing apps on their respective platform. I personally won't bother with IOS at this stage, as I'm an android kinda guy. Sorry, Apple fans.
If you've got those installed, it's time to get Git for Windows. Most of the installer is a typical game of smash the next button. Except for this screen:
Make sure you check the Git Bash box, and the GUI is optional.
The next screen determines how you run Git. You can run it from the Command Prompt, with or without Unix tools. It really didn't matter to me, I stuck with the Git Bash.
This next screen should look like this, as it says; its the recommended setting for windows.
The Git bash will make installing things a bit easier. Instead of downloading installers we just run one from the command line. But before we get to do any of that, we need NodeJs, there's a big green INSTALL button on their website, you can't miss it. Installing it should be easy. Click next/okay/yes/letsgetthisdone until it goes away.
Now run the Git Bash. It should show up in the Windows start button search box. Just type this in the command line and hit enter:
npm install -g cordovaNote: You may run into issues with these commands, on Windows 8.1 my Environment Variables weren't working properly. If you get an error similar to "npm not found", try a reboot.
Assuming Cordova installed correctly, now install ionic:
npm install -g ionicNow that ionic is installed, you can create a starter app from a template using the following command:
ionic start myApp sidemenuBy default, a folder named myApp will be created in your user folder, usually located in the Users folder on the C drive. Open the myApp folder, then the WWW folder. Open the index.html file to see the app.
Most of the important files you will be working with are in the WWW folder. You can edit these with whatever IDE you prefer for JavaScript and HTML. I'll cover that at a later time.
Thursday 12 February 2015
Obligatory Introduction Post
First things first, I should introduce myself.
My name is Robert Bryant, and I am currently studying Software Development at the Galway-Mayo Institute of Technology (GMIT). I've got a decent background in IT and Communications, about five and half years in the US Navy as an IT. From radio communication with handheld HF transceivers, to network and server administration, I did a bit of everything. But, as cliche as it sounds, it didn't start there.
 It started around the time I was seven, my family had an old Intel 386. It had a TURBO button, naturally it was never turned off. I remember playing your run of the mill children's games, chasing down the alphabet as Donald Duck. Eventually my father bought a new computer, a 486. I received the old one, along with the responsibility of fixing it when I broke it (and I did, a lot). As my father continued to upgrade his computer, I continued to inherit his older ones, I broke them too. All in all I've spent a fair amount of time in front of a screen and my posture reflects that...
Fast forward 20 years.
This is my second year at GMIT, and so far things are going well. I'm enjoying
this course, it's been very hands on and I don't think there is a better way to learn coding. So far we've covered Java, C, C#, and HTML/CSS. We've done a fair bit of Business and Business Communications on the side as well. But this year GMIT changed the curriculum to include cross platform app development with the Ionic Framework. It is very much a "learn it yourself" environment at this point. I immediately realized that there are many different parts that go into making an Ionic app. In a way it's like a Windows app, you use a markup language to control the look and feel of the app, but the real work is done in a more object-oriented language. Except AngularJS isn't really a proper, full fledged object-oriented language... but technicalities are overrated, and metaphors are fun.
Learning Ionic, conveniently enough, coincides with a project in another course of mine; to create an online presence through a blog. As you might guess, this would be that blog. So I decided to put what I learn to the metaphorical paper, as I learn it.
My name is Robert Bryant, and I am currently studying Software Development at the Galway-Mayo Institute of Technology (GMIT). I've got a decent background in IT and Communications, about five and half years in the US Navy as an IT. From radio communication with handheld HF transceivers, to network and server administration, I did a bit of everything. But, as cliche as it sounds, it didn't start there.
It started around the time I was seven, my family had an old Intel 386. It had a TURBO button, naturally it was never turned off. I remember playing your run of the mill children's games, chasing down the alphabet as Donald Duck. Eventually my father bought a new computer, a 486. I received the old one, along with the responsibility of fixing it when I broke it (and I did, a lot). As my father continued to upgrade his computer, I continued to inherit his older ones, I broke them too. All in all I've spent a fair amount of time in front of a screen and my posture reflects that...Fast forward 20 years.
This is my second year at GMIT, and so far things are going well. I'm enjoying
 |
Learning Ionic, conveniently enough, coincides with a project in another course of mine; to create an online presence through a blog. As you might guess, this would be that blog. So I decided to put what I learn to the metaphorical paper, as I learn it.
Subscribe to:
Posts (Atom)